Diary 02 Daily lifeSmart home
Build a personal media centre with a Raspberry Pi 5

A personal media centre is your own mini Netflix, running on a small computer at home. You put your films, shows, music and home videos on a hard drive. Then you watch them on your TV, laptop or phone, even when you’re away. A Raspberry Pi 5 and a free app called Jellyfin are all you need to build one.
This guide explains why it’s worth doing, what to buy, and every step of the setup. At the end, I show two ways to reach it from your phone over the internet, including port forwarding on your router. Plan on an afternoon.
Why a home media centre makes sense now
Streaming used to be cheap. It isn’t any more. Here are Australian prices at the time of writing, from Tom’s Guide. Netflix Standard is $20.99 a month, Disney+ Standard $17.99, Prime Video $12.99 and Stan Standard $17.99. Together that’s about $70 a month, or roughly $840 a year. Prices keep going up, too. Disney+ raised its prices again in April 2026.
The bigger problem is that your favourite films can disappear. Streaming services rent most of their shows from studios, and when a deal ends, the show leaves. Disney and Warner Bros. took many shows back from Netflix. The Streamable wrote: “These shows were never meant to stream on Netflix on a permanent basis.”
A media centre fixes that. What’s on your drive stays on your drive. There are no ads, no monthly fee and no one deciding what you can watch. I’m not saying cancel everything. For new releases, streaming is still the easy option. But for the films you love and watch again and again, owning them is better.
One important note on what you put on it. In Australia, the legal exception for copying films for private use only covers old analog formats like videotape. The Australian Law Reform Commission says it “does not allow digital-to-digital copying”, so ripping DVDs and Blu-rays isn’t covered. Fill your library with your own videos, digital films you’ve bought without copy protection, old tapes you’ve digitised, and public domain films. If you’re unsure about something, check with a legal adviser.
What you need
Here’s the shopping list. You may already have some of it.
- Raspberry Pi 5 with 4 GB or 8 GB of memory. 4 GB is plenty for Jellyfin.
- The official 27W USB-C power supply. The Pi 5 needs 5V at 5A, and a weak phone charger causes random crashes.
- A case with a fan, or the official Active Cooler. The Pi runs warm when it works hard.
- A microSD card, 32 GB or bigger, for the operating system.
- An external USB hard drive or SSD for your films. Plug it into one of the blue USB 3 ports. A 4 TB drive holds hundreds of films.
- An Ethernet cable to your router. Wi-Fi works, but a cable is faster and more reliable for video.
- A computer to set it all up. You don’t need a keyboard or screen for the Pi.
The software is all free: Raspberry Pi OS, Jellyfin, and either Tailscale or Caddy for access from outside. I’ll explain those two later.
Step by step: set up the Raspberry Pi
1. Put Raspberry Pi OS on the card
Download Raspberry Pi Imager on your computer and put the microSD card in. Then:
- Choose Raspberry Pi 5 as the device.
- Choose Raspberry Pi OS (other) → Raspberry Pi OS Lite (64-bit). Lite has no desktop, which leaves more power for video.
- Choose your microSD card, then open the settings when Imager asks about customisation.
- Set the hostname to
mediapi, pick a username and a strong password, and turn on SSH. SSH lets you control the Pi from your computer. - Write the card, put it in the Pi, plug in the Ethernet cable and the drive, then the power.
2. Connect from your computer
Wait two minutes for the first boot. Then open Terminal on a Mac, or PowerShell on Windows, and type this (use your own username):
ssh [email protected]Type yes the first time, then your password. You’re now typing commands on the Pi. Update it first:
sudo apt update && sudo apt full-upgrade -y3. Connect your media drive
The easiest choice is a drive formatted as exFAT, because Mac, Windows and the Pi can all read it. So you can copy films onto it from your computer first. Format it on your computer if it’s new (this erases it), copy your files, then plug it into the Pi.
Now tell the Pi to open the drive every time it starts. First, find the drive’s ID:
lsblk -fLook for your drive (usually sda1) and copy the UUID next to it, something like 1A2B-3C4D. Make a folder for it and open the settings file:
sudo mkdir -p /mnt/media
sudo nano /etc/fstab
Add this line at the bottom, with your own UUID:
UUID=1A2B-3C4D /mnt/media exfat defaults,nofail,uid=1000,gid=1000,umask=022 0 0Press Ctrl + O to save and Ctrl + X to close. The nofail part means the Pi still starts if the drive is unplugged. Then load it and check you can see your files:
sudo systemctl daemon-reload
sudo mount -a
ls /mnt/media
Step by step: install Jellyfin and add your films
4. Install Jellyfin
Jellyfin gives you an install script. These commands download it, check it hasn’t been changed, and then run it:
curl -s https://repo.jellyfin.org/install-debuntu.sh -O
curl -s https://repo.jellyfin.org/install-debuntu.sh.sha256sum -O
sha256sum -c install-debuntu.sh.sha256sum
sudo bash install-debuntu.sh
The check should say install-debuntu.sh: OK. If it doesn’t, stop and download it again. When the install finishes, Jellyfin starts on its own, and it starts again every time the Pi boots.
5. Sort your files so Jellyfin can find them
Jellyfin fetches posters, descriptions and cast lists by itself. It just needs tidy names. This layout works well:
/mnt/media/Movies/The Movie Name (2019)/The Movie Name (2019).mkv
/mnt/media/Shows/Show Name/Season 01/Show Name S01E01.mkv
/mnt/media/Music/Artist/Album/01 Song.mp3
The year in brackets helps a lot. Without it, Jellyfin can mix up a film with its remake from twenty years later.
6. Run the setup wizard
On your computer, open http://mediapi.local:8096 in a browser. The wizard asks for:
- Your language, and an admin username and password. Make the password strong, because this account controls everything.
- Your libraries. Click Add Media Library, choose Movies, and pick
/mnt/media/Movies. Do the same for Shows and Music. - Your country and language for film details.
- Remote access. Leave Allow remote connections to this server ticked if you want to watch away from home.
Give it a few minutes to scan. Then your films appear with posters, like a real streaming service. Add a separate account for each person in the house, so everyone gets their own “continue watching” list.
At home, install the Jellyfin app on your phone, smart TV or streaming stick, and it usually finds the server by itself. If it doesn’t, type http://mediapi.local:8096 as the server address.
Watch it on your phone, away from home
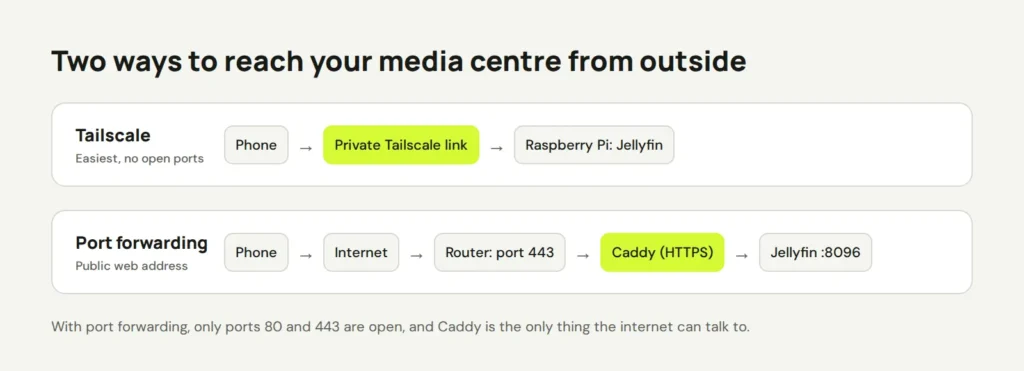
Inside your house, your router keeps the Pi hidden from the internet. To watch on the train, you need a way in. There are two good options, and I’d start with the first one.
Option A: Tailscale (easiest and safest)
Tailscale makes a private, encrypted link between your own devices. Nothing is opened on your router, and it even works when port forwarding can’t. The Personal plan is free for up to six users. On the Pi, run:
curl -fsSL https://tailscale.com/install.sh | sh
sudo tailscale up
It prints a link. Open it and sign in. Then install the Tailscale app on your phone and sign in with the same account. Now, from anywhere, open the Jellyfin app and use http://mediapi:8096 as the server address. If that name doesn’t work, run tailscale ip -4 on the Pi and use that number instead.
Option B: port forwarding on your router
Port forwarding tells your router to send some outside traffic to the Pi. It’s the way to go if you want a normal web address, like media.yourdomain.com, that works on any device without an extra app. Think of your router as the front desk of a building. Port forwarding tells it which visitors to send up to which flat.
Be careful here. Jellyfin’s own networking guide warns that “opening a port directly to the Internet is therefore insecure and not recommended.” So don’t forward port 8096. Instead, put a small web server called Caddy in front of Jellyfin. Caddy adds HTTPS encryption with a free certificate and handles all outside visitors.
- Check you can port forward. Many Australian internet providers use CGNAT, which shares one public address between many customers and blocks port forwarding. Look at the internet (WAN) address in your router. If it starts with
100.and doesn’t match what a site like whatismyip.com shows, you’re behind CGNAT. Ask your provider to turn it off. Aussie Broadband, for example, does it for free. - Give the Pi a fixed address at home. Run
hostname -Ion the Pi to see its address, like192.168.1.50. In your router, find DHCP reservation (sometimes called static lease) and reserve that address for the Pi. - Point a web address at your home. You need a domain or subdomain that points to your home’s public IP address. If your provider changes that IP, use dynamic DNS (DDNS). Many routers have a DDNS setting, and free services like DuckDNS work too.
- Install Caddy on the Pi. Run
sudo apt install caddy, then open its settings withsudo nano /etc/caddy/Caddyfile. Replace everything in the file with the lines below, using your own address. Save, then runsudo systemctl reload caddy.
media.yourdomain.com {
    reverse_proxy localhost:8096
}- Forward the ports in your router. Log in to your router (often
192.168.1.1) and find Port Forwarding. It may be under Advanced, NAT or Virtual Servers. Add two rules: TCP port443and TCP port80, both to the Pi’s address. Caddy uses port 80 to get its certificate, and 443 for everything else. - Tell Jellyfin about Caddy. In Jellyfin, go to Dashboard → Networking, add
127.0.0.1under Known proxies, and save. This lets Jellyfin see who is really connecting. - Test it on mobile data. Turn off Wi-Fi on your phone and open
https://media.yourdomain.com. You should see the Jellyfin login with a padlock. Use the same address in the Jellyfin app.
Once it’s open to the internet, every account needs a strong password. In each user’s settings, you can also untick remote access for people who only watch at home.
Keep it running smoothly
- Update every month or so. Run
sudo apt update && sudo apt full-upgrade -y. It updates the system, Jellyfin and Caddy together. - Use files your devices can play directly. Jellyfin’s docs say the Pi 5 “lacks hardware encoders entirely.” So converting video on the fly (transcoding) is slow, especially 4K. Files in H.264 or H.265 with AAC sound play directly on most devices, with no converting needed.
- Back up what you can’t replace. Home videos only exist once. Keep a second copy on another drive or in the cloud.
- Keep it cool. A fan and a spot with some air around it stop the Pi slowing down on long movie nights.
If you enjoy this kind of project, the same Pi can run other home tools too. My guide to installing Home Assistant on a Raspberry Pi is a good next one. Enjoy the popcorn.
Opens in a new tab
Comments
No comments yet. Questions, fixes and better ways are all welcome.