
Your domain already has DNS, usually at the company you bought it from. If you move that DNS to Cloudflare’s free plan, you get a faster site, free SSL, attack protection and a hidden server address. You don’t pay anything, and you don’t move the domain.
Below I explain what changes when Cloudflare runs your DNS and what the free plan gives you. Then I walk you through the setup, step by step, and the dashboard tools worth learning.
Registrar DNS vs Cloudflare DNS: who answers for your domain
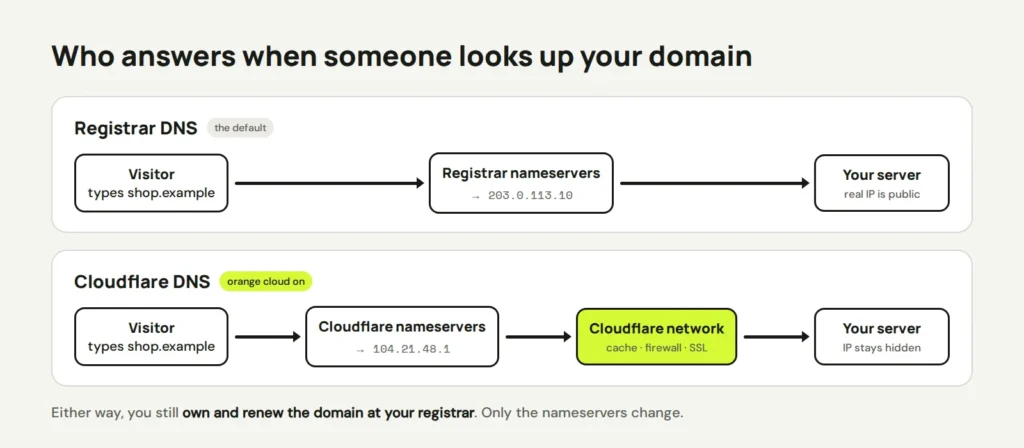
DNS (the Domain Name System) is the internet’s address book. When someone types your domain, a nameserver answers with your server’s address. Whoever runs your nameservers controls that answer.
When you buy a domain, the registrar (the company that sold it to you) gives you its own nameservers for free. They work fine. But they are a plain address book. They hand out your server’s real IP address and do nothing else.
With Cloudflare, the domain stays at your registrar. You only swap the two nameservers there for the two that Cloudflare gives you. From then on, Cloudflare answers, and it can put its own network in front of your site.
| Registrar DNS | Cloudflare DNS | |
|---|---|---|
| Where you pay for the domain | Your registrar | Still your registrar |
| Where you edit DNS records | The registrar’s control panel | The Cloudflare dashboard |
| What a lookup shows | Your server’s real IP address | A Cloudflare IP address, when the record is proxied |
| Extras | Usually none | Free SSL, caching, firewall and DDoS protection |
| Cost | Free with the domain | $0 on the free plan |
Think of it like a mail redirect. Your house stays the same, but your post now goes through a sorting office that throws out the junk first.
Cloudflare also sells domains with “no markup“, but you don’t need to move your domain there to use the free plan.
What you get on the free plan
The free plan costs $0 a month, and for most small business sites it is all you need. These are the parts I care about most:
- Unmetered DDoS protection. A DDoS attack floods a site with fake visits. Cloudflare blocks that traffic before it reaches your server.
- A free SSL certificate, so browsers show the padlock.
- A CDN (content delivery network). Cloudflare keeps copies of your images, CSS and JavaScript in data centres in 348 cities, close to your visitors.
- A firewall with a free managed ruleset, plus 5 custom rules of your own.
- Bot Fight Mode, which challenges known bad bots.
- One basic rate limiting rule, to slow down anyone who sends too many requests to a page like your login.
- Fast DNS, and simple charts of your traffic and the threats Cloudflare blocked.

One thing surprises people. By default, Cloudflare “does not cache HTML or JSON“. It caches files like images, CSS and JavaScript, and your pages still come from your server.
So Cloudflare makes a good site faster, but it can’t fix a slow one. If your pages are slow to load, start with my guide to speeding up a slow WordPress site.
Set it up, step by step
The steps are the same for a brand new site and for one that has been live for years. On a live site, a missing record can break your email, so take your time on step 3.
- Sign up at dash.cloudflare.com. Turn on two-factor login straight away.
- Select Onboard a domain, type your domain without www (like
example.com.au) and pick the Free plan. - Check the DNS records that Cloudflare’s quick scan found. Compare them with the DNS page at your registrar. Look for the root domain,
wwwand every email record (MX, SPF, DKIM and DMARC). Add any that are missing. - If your domain uses DNSSEC (signed DNS answers), turn it off at your registrar first. Cloudflare warns that changing nameservers while it is on “can cause your domain to become unreachable“.
- Copy the two nameservers Cloudflare shows you. They end in
ns.cloudflare.com. At your registrar, replace the old nameservers with these two. - Wait. Cloudflare says it can take up to 24 hours. You get an email when your domain is Active.
- Set the SSL mode (see the dashboard section below).
- Turn DNSSEC back on, this time in Cloudflare under DNS → Settings. Then add the DS record it shows you at your registrar.
<form class="cl">
  <label><input type="checkbox"> Sign up and turn on two-factor login</label>
  <label><input type="checkbox"> Add the domain and pick the Free plan</label>
  <label><input type="checkbox"> Check the website and email records</label>
  <label><input type="checkbox"> Turn off DNSSEC at the registrar</label>
  <label><input type="checkbox"> Swap in the two Cloudflare nameservers</label>
  <label><input type="checkbox"> Wait for the "Active" email</label>
  <label><input type="checkbox"> Set SSL to Full (strict)</label>
  <label><input type="checkbox"> Turn DNSSEC back on in Cloudflare</label>
  <p class="bar"><span class="count"></span> of 8 done</p>
  <p class="done">All done. Your site now runs through Cloudflare.</p>
  <button type="reset">Start again</button>
</form>
.cl { width: min(100%, 560px); counter-reset: done; }
.cl label { display: flex; align-items: center; gap: 12px; padding: 10px 14px; margin-bottom: 6px; background: #fff; border: 2px solid #D8D9D1; border-radius: 10px; cursor: pointer; font-size: 15px; transition: background .2s; }
.cl input { width: 20px; height: 20px; accent-color: #171915; flex: none; }
.cl input:checked { counter-increment: done; }
.cl label:has(input:checked) { background: #D5FA35; border-color: #171915; text-decoration: line-through; }
.cl input:focus-visible { outline: 3px solid #5B4AE8; outline-offset: 2px; }
.bar { margin: 12px 0 0; font-weight: 700; font-size: 16px; }
.count::before { content: counter(done); }
.done { display: none; margin: 8px 0 0; padding: 12px 14px; background: #171915; color: #D5FA35; border-radius: 10px; font-weight: 700; }
.cl:not(:has(input:not(:checked))) .done { display: block; }
.cl button { margin-top: 8px; padding: 6px 0; border: 0; background: none; text-decoration: underline; cursor: pointer; color: #5C5E57; font-size: 14px; }For a new site, I’d do all of this before launch. Then nothing live can break, and your server’s IP is never public. Cloudflare also has a short official video about onboarding a domain if you like to watch first.
Turn on the orange cloud to hide your server
In the DNS list, every A, AAAA and CNAME record has a cloud icon. An orange cloud means Proxied, so traffic goes through Cloudflare. A grey cloud means DNS only, so Cloudflare just hands out your real IP. Flip the switch below to see the difference.
<div class="px">
  <div class="rec">
    <span class="t">A</span>
    <span class="n">shop.example</span>
    <span class="ip">203.0.113.10</span>
    <span class="sw" role="radiogroup" aria-label="Proxy status">
      <input type="radio" name="p" id="p0" checked><label for="p0"><svg viewBox="0 0 32 20" aria-hidden="true"><path d="M8 19a7 7 0 0 1-1-13.9A9 9 0 0 1 24 6a6.5 6.5 0 0 1 1 13z"/></svg>DNS only</label>
      <input type="radio" name="p" id="p1"><label for="p1"><svg viewBox="0 0 32 20" aria-hidden="true"><path d="M8 19a7 7 0 0 1-1-13.9A9 9 0 0 1 24 6a6.5 6.5 0 0 1 1 13z"/></svg>Proxied</label>
    </span>
  </div>
  <div class="path">
    <span class="box">Visitor</span>
    <i class="ar"></i>
    <span class="box cf">Cloudflare<small>cache, firewall, SSL</small></span>
    <i class="ar a2"></i>
    <span class="box srv">Your server<small class="sip"></small></span>
  </div>
  <div class="look"><small>Anyone who looks up shop.example gets</small><strong class="v-ip"></strong></div>
  <ul class="gets">
    <li>Real server IP hidden</li>
    <li>Protection from DDoS floods</li>
    <li>Images, CSS and JS cached near visitors</li>
    <li>Firewall and bot rules apply</li>
  </ul>
</div>
.px { width: min(100%, 660px); }
.rec { display: flex; flex-wrap: wrap; align-items: center; gap: 10px 14px; padding: 12px 14px; background: #fff; border: 2px solid #D8D9D1; border-radius: 12px; font-size: 15px; }
.rec .t { padding: 2px 8px; background: #171915; color: #F5F5F0; border-radius: 6px; font-weight: 700; }
.rec .n { font-weight: 700; }
.rec .ip { color: #5C5E57; font-family: "Space Mono", monospace; font-size: 14px; }
.sw { display: flex; gap: 6px; margin-left: auto; }
.sw input { position: absolute; opacity: 0; }
.sw label { display: flex; align-items: center; gap: 6px; padding: 7px 14px; border: 2px solid #171915; border-radius: 999px; cursor: pointer; background: #fff; font-size: 14px; }
.sw svg { width: 24px; height: 15px; fill: #9A9C94; }
.sw label[for="p1"] svg { fill: #F38020; }
.sw input:checked + label { background: #171915; color: #F5F5F0; }
.sw input:focus-visible + label { outline: 3px solid #5B4AE8; outline-offset: 2px; }
.path { display: flex; align-items: center; margin: 18px 0 14px; }
.box { padding: 12px 10px; min-width: 96px; text-align: center; background: #fff; border: 2px solid #171915; border-radius: 12px; font-weight: 700; font-size: 15px; transition: opacity .3s, background .3s; }
.box small { display: block; font-weight: 400; font-size: 12px; color: #5C5E57; }
.ar { flex: 1; height: 4px; margin: 0 6px; background: #171915; border-radius: 4px; position: relative; }
.ar::after { content: ""; position: absolute; right: -2px; top: -5px; border: 7px solid transparent; border-left: 9px solid #171915; border-right: 0; }
.look { padding: 12px 14px; background: #171915; color: #F5F5F0; border-radius: 12px; }
.look small { display: block; color: #C9CBC2; font-size: 12px; }
.look strong { font-family: "Space Mono", monospace; font-size: 17px; }
.gets { list-style: none; margin: 12px 0 0; padding: 0; display: grid; grid-template-columns: 1fr 1fr; gap: 8px; font-size: 14px; }
.gets li { padding: 9px 12px 9px 34px; border-radius: 10px; background: #EDECE6; color: #5C5E57; position: relative; transition: background .3s; }
.gets li::before { content: "✕"; position: absolute; left: 12px; font-weight: 700; }
/* DNS only: Cloudflare is skipped, the real IP is public */
.cf { opacity: .3; border-style: dashed; }
.v-ip::after { content: "203.0.113.10 (your real server)"; }
/* Proxied */
.px:has(#p1:checked) .cf { opacity: 1; border-style: solid; background: #D5FA35; }
.sip::after { content: "203.0.113.10"; }
.px:has(#p1:checked) .sip::after { content: "IP hidden"; }
.px:has(#p1:checked) .v-ip::after { content: "104.21.48.1 (a Cloudflare address)"; }
.px:has(#p1:checked) .gets li { background: #D5FA35; color: #171915; }
.px:has(#p1:checked) .gets li::before { content: "✓"; }
@media (max-width: 520px) { .rec { gap: 8px; } .rec .ip { display: none; } .sw { margin-left: 0; } .gets { font-size: 13px; gap: 6px; } .gets li { padding: 8px 8px 8px 28px; } .gets li::before { left: 10px; } .box { min-width: 0; font-size: 13px; padding: 10px 6px; } .look strong { font-size: 15px; } }Proxy your website records, which are usually the root domain and www. Leave the email records grey. Cloudflare only proxies web traffic, so it can’t proxy MX records or your mail server.
Be careful here. If a grey record points to the same server as your website, anyone can look up that IP. Cloudflare’s docs say a dig query on that record “reveals your origin server’s IP address“. Most small businesses use Google Workspace or Microsoft 365 for email, which avoids this.
Once your records are orange, two more things are worth doing:
- Your server now sees Cloudflare’s addresses instead of your visitors’. The real visitor IP arrives in the
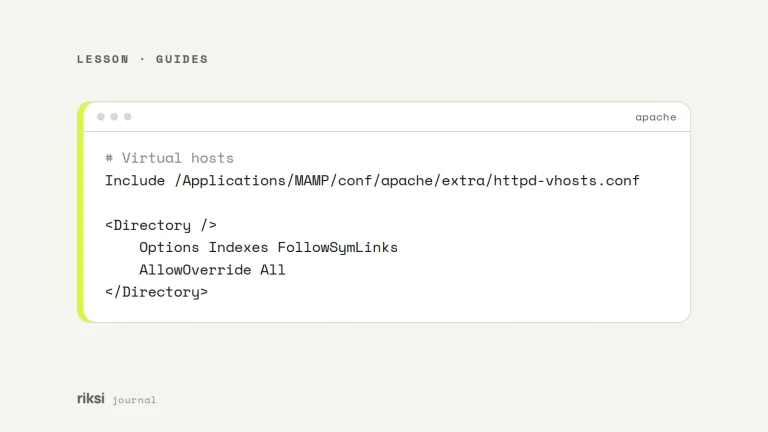
CF-Connecting-IPheader. Many hosts handle this for you. On your own Apache server, the mod_remoteip module reads it. - For the strongest setup, let your server accept web traffic only from Cloudflare’s IP ranges. Then nobody can go around the proxy. On a cloud server like Vultr, you do this with its firewall.
RemoteIPHeader CF-Connecting-IP
RemoteIPTrustedProxy 173.245.48.0/20
# Add one RemoteIPTrustedProxy line for each range at cloudflare.com/ips
The dashboard tools worth learning
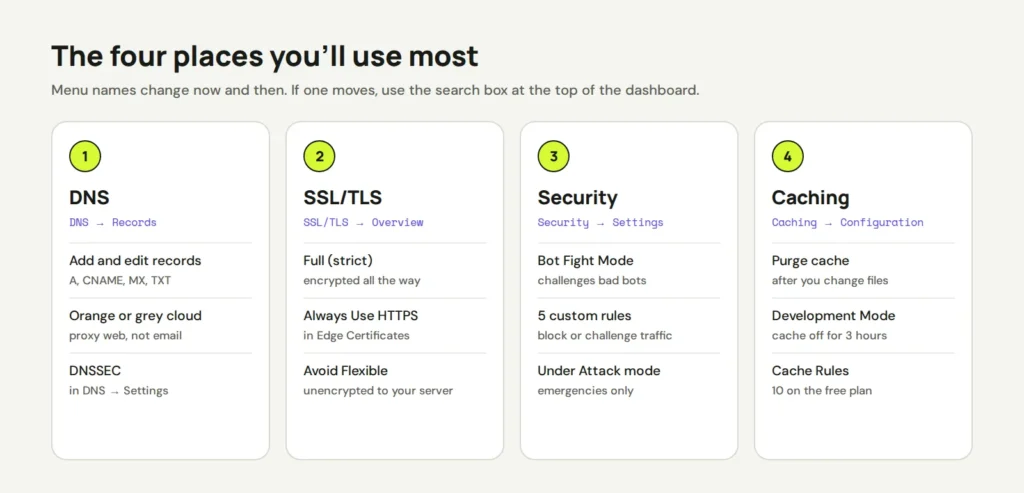
The dashboard has a lot of menus, but you only need four of them. Cloudflare moves things around now and then. If a menu has a new name, use the search box at the top.
DNS
Under DNS → Records you add and edit records, and switch the cloud between orange and grey. Proxied records always use a TTL (cache time) of Auto, which is 300 seconds, so changes show up fast.
SSL/TLS
Set the mode under SSL/TLS → Overview. I always pick Full (strict) when the server has a valid certificate, and most hosts give you one for free. New domains may start on Automatic, which picks the safest mode your server supports. Avoid Flexible. It leaves the link to your server unencrypted, and it often causes redirect loops on sites that already force HTTPS.
Then turn on SSL/TLS → Edge Certificates → Always Use HTTPS. It sends every http visit to https.
Security
- Bot Fight Mode is under Security → Settings. It “may challenge API or mobile app traffic“, and rules can’t skip it. If a payment or booking service stops reaching your site, check here first.
- Custom rules let you block or challenge traffic. A good first rule on WordPress challenges every visit to
/wp-login.phpfrom outside your own country. - Under Attack mode shows a check page to every visitor for a few seconds. Cloudflare calls it “one of the last resorts”, so turn it on only during an attack and off again afterwards.
Caching
Under Caching → Configuration, use Purge Everything after you change images or CSS and visitors still see the old ones. Development Mode turns the cache off for three hours while you work on the site. Later you can add Cache Rules (10 on the free plan) to cache more. Be careful with carts, checkouts and account pages, though. Cached private pages are a bad surprise.
Check that it worked
Run these three commands in a terminal, with your own domain:
dig NS example.com.au +short
dig example.com.au +short
curl -sI https://example.com.au | grep -iE "server|cf-cache"
The first command should show two nameservers ending in ns.cloudflare.com. The second should show Cloudflare addresses, not your server’s IP. The third should show server: cloudflare.
A page usually shows cf-cache-status: DYNAMIC, because HTML isn’t cached. Run the same command twice on an image address, and the second time it should say HIT. For more checks like this, see how to check redirects and headers with curl.
Once it’s set up, Cloudflare mostly runs in the background. If you’d rather not touch the nameservers of a live shop yourself, we can do the switch for you.
Opens in a new tab
Comments
No comments yet. Questions, fixes and better ways are all welcome.